April... seriously... is that the last time that I blogged??
Well, I would like to say that I've missed it, but I haven't really had chance to! There's been so many things going on for me that I just haven't had the time. I've been caring for two little additions to our home - a couple of little leopard tortoises. I've also been doing a course at college, which has now come to an end until September. I've been working, and I've been out in the garden growing flowers and weeds.
So.... normal service will resume properly now, and I will be posting a few cards and things I've been making over the last few months.
I hope you've had a little patience with me, and glad you're still here!!!
Wednesday, 19 July 2017

Thursday, 27 April 2017
Dainty dies and roses
Good evening folks...
I am so glad that you enjoyed the shows on Hochanda yesterday - it's always a pleasure to work with the lovely folks down there. And it's also a joy knowing that you love the selections that are bought to you by ourselves and JoyCrafts.
The stamps from the shows today were no exception, so I thought I would share a little card or two with some of the products from the show.
The first card I want to share with you is this little frame that was die cut from red and white cardstock. It's quite a simple card to build up. Basic matting and layering onto the card base which was a 7 inch x 7 inch card, coming down in quarter inch sections.
The first layer was cut from white - this was the outside edge of the die, followed by a layer of red which had the inside detail for the diecut.

The very centre die cut was a square from the Card Model we had on the show - these are the ones that make the three dimensional cards, and this section is the lacy middle. It fits, as you can see, perfectly into the middle of the other die. I finished it off with a little rose stamp image that was coloured with copic markers.

The little card below was an A5 card, and it is one of my favourite ones from the shows.

You know sometimes when you have an idea in your head for what you want to achieve with a card? Well, this wasn't it when I started.....!!!
I didn't really know what I wanted it to finish like, I was just playing along with the various dies I had out in front of me, and came up with this as a layout, so just stuck it all together and it seemed to work.

The centre is the circle die we had on the show, and I laced around the centre with a piece of 1/4" satin ribbon. The white middle is the layer that comes with this die set, and you can see you can use it for a layer, or indeed for an aperture if you wish.
The flowers were from the little sets we had - the embroidery dies - but I just loved the detail that was in there so left them plain, and used a little bit of distress ink to add some colour to those and the swirly bits.
The outside stitchy edge was another popular set of stamps. These were borders and there were OODLES of them on one sheet....!
I will try to bring you a little bit more inspiration tomorrow... I hope you can join me.
Until then, Happy Crafting xxx
Wednesday, 26 April 2017
Beautiful Sherri stamps.....
Good morning all...
I know I regularly promise to keep this old blog upto date, but things just seem to get in the way (as they do!!)
So... what's happened this last few weeks.. well, to start with it's been Easter, so spent a little time doing not alot combined with some bits for work on and off... I made some wreaths and treats that I will share on another post, had a bit of time with family, went away... had a poorly wooflet that needed a couple of ops, but is now all sorted and running fit as a fiddle.
And finally I'm back here... to share these.

The stamps and dies are part of a bundle that I have bought to Hochanda as part of the Joycrafts shows today, and I think they work together absolutely perfectly. They are so sweet.
The images are by Sherri Baldy, one of my favourite stamp designers I must say, and if you look through my blog, I'm sure you will come by a few of the things I have made with her stamps in the past. She is a lovely lady too - such a sweetheart. Anyway... back to the subject in hand... and as you can see, we had a choice of two stamps available today. The one above I think is my favourite as it has woolly hair that is just adorable.
I used the no lines colouring technique, by stamping with a Desert Sand Momento ink and colouring in with copic markers. I still love to spend the time adding freckles to the cheeks with gel pens, so this just finishes it off nicely.
The card below is a larger card, 8x8" and has Graphic 45 papers that I found, and decided to use for the background. The colours were really nice and bright - just perfect for a summery card. Well, I say summer in the broadest sense of the word as we had snow yesterday!!!!

On this card, I used the other lovely Sherri image, and stamped it and coloured with copics again. I chose to use one of the corners from the show to create the rectangular frame that goes around the outside edge of the image. Just by placing them together and overlapping you will be able to cover a larger area with a more squarer format. We did the circular die in this too - and it had some beautiful daisy type flowers in it.. just nip off to Hochanda to check out the shows - they were on today at 7am, 1pm and 3pm.

Something a little bit different on this one for you... a pencil toned image. Stamped in Tuxedo black and shaded with HB and 6B pencils. I also added a little bit of sepia coloured pencil too for a dash of tone to the image.
The dies around the image - the bubbles - are coming up at 3pm - and make a lovely background to your designs if you aren't really into flowers and flourishes.
Well... that's it for today, but I hope that you can check back to see my other posts... I have them lined up and ready, they just need to have the PUBLISH button pressed..
Until then... Happy Crafting!
Thursday, 30 March 2017
Missing again!!!!
Good evening my lovelies... how are you all tonight? You may want to grab a cuppa and a few biscuits as it could be a long one lol.
Well.... I started off tonight with good intentions of doing a blog post, but with one or four other things to catch up on I didn't really get the time. So. I thought I would sit and have a little natter before I retire to the boudoir!
I would like to say the past few weeks have been quite relaxing.. but it would be a far stretch of the imagination if I actually said that lol. Apart from last week - where we enjoyed a lovely few days away, just me and he hubs. We really needed a break so decided between my work schedule and halfway towards our main holiday, we would treat ourselves.
By 'eck.... we had a lovely time too. We went down to Kent - Hawkinge in particular - and stopped in a beautiful property we found on Air B and B. First time we have ever used it for holidays, but we absolutely weren't disappointed. Guy and AnnaLouise who owned the property had a fantastic little chalet bungalow on their grounds, very private, very quiet - apart from the roosters which was lovely to wake up to every morning. And they weren't half as noisy as I expected them to be. They had a couple of horses, donkey, dogs... it was just wonderful. And such lovely people too - I highly recommend their place, and will certainly be going back.
So... what else have I been up to? Well... we've been back and forth to the vets with various little fur balls - the daughters puppy had a vegetable seed attached to his eye, which caused a few problems - he ended up at the specialists in Derby to have it dealt with.... all well now. The sister in law's cats have been to and fro, vaccinations, denials, extractions and the like... all healed up now. Son had his puppy to the vet as the breeder let him go with conjunctivitis and it was a bit of a sod to clear up. All better now. And our boy Scoobs... had a couple of odd lumps on his lip and gum. He's been in for an operation to take the one off his lip and do a biopsy 'bit' on his gum one... results should be back anytime.
It was Mothers Day the other day as you know, and it was lovely having all the family together for a meal. It was a tad bonkers with all the dogs in the house... but it was good fun to see both puppies playing together, even if it does stress out the oldies a little. Lol. They are really tolerant of the babies to be honest, but Scoobs is the most unsure when they run round his legs. He is such a softie and won't tell them off. Truly tells them off but wags her little waggler in a playful way, and Holly just reverts to baby after a while. It's cute to watch them all together.
I've been down to Hochanda too for a few shows whilst I've been missing in action here. It's been a bit busy with JoyCrafts, and we have tried to bring you a good range of variety of products over the past couple of months. This last week we have had farm animals and butterflies - I think two lots of your favourite things as they were selling like hot cakes. I had a migraine on the day of the show and the first hour was a bit of a nightmare as towards the end, my mind went completely blank and i couldn't remember a thing... not good when you are trying to show how to use an envelope maker... !!!
A few of my migraine tablets, a walk in the fresh air and a couple of cups of dandelion coffee and lots of water sorted me out, and I was back up and firing on all cylinders (as many as usually work!!!) in time for the second show of the day.
I will come back on tomorrow and share a few things that I've been making.. but really just wanted to say hello to those who still come and read the ol' boglet. It's nearly 10 years old since I've been doing this.... I can't believe how time flies.
Anyway.. until next time.. Happy Crafting.... xxxx
Tuesday, 21 February 2017
I really need to get back into it......
I have missed my blogging.... seriously.... but I just don't seem to have had the inclination or time to do it. Don't ask me what I have been doing - I really couldn't tell you to be honest!
I have been doing my demo's on Hochanda for JoyCrafts, which I am thoroughly enjoying doing. They are fantastic products, fantastic prices and something different in little collections that work together. They're fab.
I've also been baking bits and bobs, keeping all the family well pudded up. Haha. A variety of different makes came from the kitchen - French Apple Tarts, buns, scones, fruit cakes, apple cakes... you name it and it's probably been done.
I will really try to get on top of the blogging again... and will share my makes and bakes like I used to do, but I wanted to let you know that I haven't disappeared all together. I will be back blogging very soon!
Hope you have beared with me during my absence.... and thanks if you have xxx
I have been doing my demo's on Hochanda for JoyCrafts, which I am thoroughly enjoying doing. They are fantastic products, fantastic prices and something different in little collections that work together. They're fab.
I've also been baking bits and bobs, keeping all the family well pudded up. Haha. A variety of different makes came from the kitchen - French Apple Tarts, buns, scones, fruit cakes, apple cakes... you name it and it's probably been done.
I will really try to get on top of the blogging again... and will share my makes and bakes like I used to do, but I wanted to let you know that I haven't disappeared all together. I will be back blogging very soon!
Hope you have beared with me during my absence.... and thanks if you have xxx
Thursday, 1 December 2016
A Christmas Angel for you....
Evening all... blimey... is it really nearly a month since I got on and posted to my blog?? Wowsers.. I won't let that happen again in the near future.
Tonight, I'm sharing with you all a little card I have made for Sue Dix using her amazing Sweet Dixie range of dies.
They are really lovely dies and cut so well too. I have used a few different sets to put this card together. The main focus though of course had to be the angel, as she is just so pretty!

The Angel herself I cut out of white cardstock and then inked lightly around the edges with London Fog Momento ink as I didn't want anything too harsh. I layered her onto the same cardstock I was planning to use for the layers on my card, the red, and cut around the sleeves and skirt. The wings I decided to use gold mirror card to add some shine.
I also used the mirror card to cut the lovely holly corners and stars.

The card itself was an 8 inch card, and the first red layer was cut to a 1/4 inch smaller. The white layer was 1/2 inch smaller.
I then cut a 6 inch square of red and again, a smaller piece of white. The white layer on this section I decided to use a gorgeous Sweet Dixie stencil, and inked through it with distress inks of different colours.
I then cut two smaller layers of red and white to put my topper onto. I cut two trees, layered them onto the same colour and inked the edges for a bit of shading. These were placed to the bottom. The angel was positioned at the top of the card and I placed her stars around her.
I cut out the beautiful flowers and leaves, inked and gelled them up, layered and stuck them into the corner of the card to add a little flourish.

Once everything was on the card, I used some glitter glue to the centre of the flower, around the trees and on the branches.
I loved making this card, I hope you like it to.
Here's a list of what I have used.
Sweet Dixie 6x6" Christmas Kaleidoscope stencil SDST0030
Sweet Dixie Church and Snowy Trees SDD195
Sweet Dixie Holly and Star Corners SDD183
Sweet Dixie Christmas Rose SDD202
Sweet Dixie Christmas Angel SDD194
Sweet Dixie Snowflake Edge SDD190
Tim Holtz Distress Ink - Forest Green, Bundled Sage, Tea Dye
White gel pen
Glitter glue - irridescent
Gold mirror card
Red and white cardstock
Offcut of ribbon
Friday, 4 November 2016
Sweet little doves
Morning all... how are you?
Well, I thought I would sit here and share a little quick make from my JoyCrafts shows last week. I got a few messages saying that folks liked this card - and it's VERY easy to make. Probably one of the simplest little cards I've made for a while.

The card blank was scored and cut to around 15cm square. Then I cut a piece of the JoyCrafts papers to around 14cm square. I sanded down the edges with a file - just a simple old nail file will do this, but you can also use a fine sandpaper if you need to. (Husband's tool boxes come in really useful!)

I took some of the beautiful swirl stamps and inked them up with some brown ink. Brown is better than black as I don't find it quite so harsh. I inked around the left side of the card, I also used versamark to make a lighter pattern on the right hand side.

I chose some of the brilliant organza JoyCrafts ribbon and created a little double bow and a small strip going down the side of the card.

To finish the card, I cut out a little frame and inked it over with a brown ink, then filed it back. The doves were cut from the dies that were on the show. These were attached with foam pads to add a little depth.
I also went around the swirls with a pearl drop to highlight them a little and add some brightness to the card.
I hope you like the quick card today, or even try to do something similar. I'd love to see it if you do.
xxx
Thursday, 3 November 2016
There are no little dreams
Good evening all....
Sorry it's been a while, but I hadn't gotten around to taking pictures of my projects this last few weeks so had nothing to upload. But that's rectified now, and there are a few things to share.
Anyway... before all of that, how are you? Have you started your Christmas cards? I admit, this year is a first as I've actually made a few. I know.... go me!!
But this last couple of weeks I've been picking and sorting product from JoyCrafts, which will hopefully be coming to a screen near you soon.
But before that... I just want to share a little demo that I did on my last shows with JoyCrafts on Hochanda at the end of October. We had some really lovely borders and corner, and I couldn't resist having a little play to put this one together.

You can see that I used the corners to make a sort-of frame around the outside edge of the card. Once I had cut all the corners, I rubbed over them lightly with some pebeo gilding wax in silver to highlight the details a little more.

The centre of the frame was cut from a beautiful frame that we had on the show - I will check the stock number for you for that. I cut it out, embossed it and again, gave it the Pebeo treatment. The top of it was then wafted over with an antistatic bag and stamped with a sentiment.
I heat embossed it with silver powder to give it some shine.
The little swirly bits and flowers were some other items from the show too - all Joy Crafts. All beautiful too. The little fern type die cuts beautifully.

I really hope you like the card for today. I will be back very soon to show you another card or two that was on the show.
until next time..... xxx
Wednesday, 26 October 2016
Little Angel...
Yes, I'm afraid I'm in full Christmas card swing now... and it's been really lovely to get time to sit and make some, and also share my makes on here with you all.
So, what have I got to share with you all today? Well, it's this sweetheart here. The cutest little Angel there ever was. You can paper piece her, stamp and colour her, doodle in her, the choice is entirely upto you.
But on this card below, I chose to colour her in very simply using my new Colourista pens and pencils - and as you can see, they work amazingly well.

There are a few different things I've used on this card, and I will be sure to list them at the end of the post.

These fab little sentiment tiles would have been so easy to make had I thought about it, but I didn't, so a random purchase a while ago from Hobbycraft bought them home with me, ready for that perfect card.

So here she is - my little Angel, in all her finery. I will list all details at the end. But as you can see, the base colouring was done by stamping in Momento, as I was using permanent colours to colour in.
I coloured in using the Spectrum Noir Colourista pencils and pens. I found the pens to be lovely with the brush nib - very precise. And then topped it up with the pencils too to deepen the shades.

On this pic, you can see where I opted to use the foils that I recieved from Stix 2. These are nice and so easy to use too.... and lovely to enable you to add a bit of luxury.
So - here's your step by steps etc.
- Take your 8" x 8" card and cut some gold mirror card and patterned paper slightly smaller in layers using your Layer Perfect tool. Stick these together and attach to the card blank.
- Take a contrast paper and cut out with a circle using your Layer Perfect tool too. Really easy to do this!
- Cut a strip of gold mirror card to around 2" wide x 7.25" long. Cut a piece of patterned paper to 1.75" wide x 7.25" long and stick together. Wrap a length of ribbon around the whole piece and then attach to the card.
- Stamp your image using Momento Tuxedo Black and colour in with your chosen pens or pencils. Add some sparkle with your Sakura pens.
- If you take your Stix 2 2 in 1 glue pen, draw around the pieces you want to foil and leave to go clear. (It goes on blue - permanent adhesive, dries clear - temporary adhesive) Then pop your foil sheet over the top and rub over to adhere the foil to the glue.
- Cut out leaving a small border, then layer onto a piece of mirror card. Trim to leave a small border. You can measure this very easily using the Layer Perfect.
- Attach the angel topper to your card using Stix 2 silicone adhesive. *I opted to use silicone because you have different depths underneath the topper, so the silicone will adjust the height accordingly*
- Finish your card by adding a bow to match your ribbon, a central flower and a board sentiment. I also added a wooden heart and some pearl drops around the design.

I hope the steps make sense... really, you can just have a play with the topper once you have coloured her in, or paper pieced her. She will look beautiful whichever way you play with the stamp.
Here are the bits I've used in my card. I would love to see what you have made... please share! xxx
SHOPPING LIST
Stix2 S57321 Layer Perfect Tool
Stix2 S572269 Tape Runner
Stix2 S57109 Transfer Foil
Stix2 2 in 1 glue pen
Stix2 S57100 Silicone Adhesive
Woodware FRS223 Patch Angel stamp
Sakura Stardust pens
Colourista pens and pencils
Momento ink - Tuxedo Black (if using alcohol pens. Stazon if watercolouring)
Dovecraft Winter Blooms paper pack
Hobbycraft Mini Christmas Signs
Hobbycraft Wooden Heart Topper
Friday, 21 October 2016
Bauble time....
Morning folks....
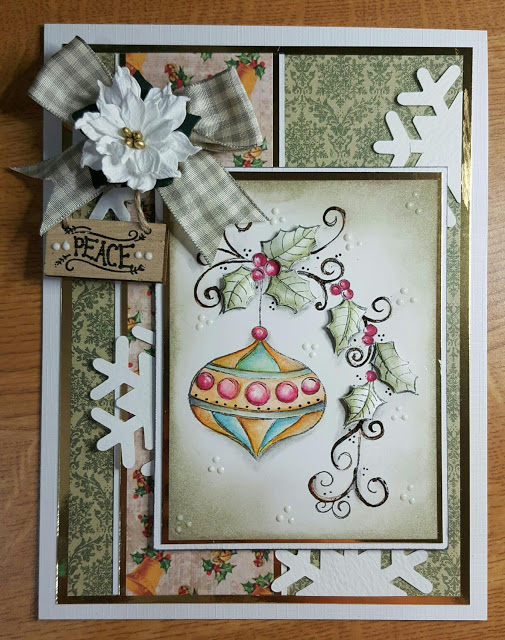


How are you all doing? Things this week have been a bit busy - not too bad - just sorting out show products for upcoming hours on Hochanda, and also been out and about visiting a very lovely person... but more on that another time!
Today, I thought I would share a little project I've made for Stix 2, and I've used a few other Woodware bits on there... and a little bit of watercolouring. Who doesn't love putting away the alcohol pens and getting back to watercolour. It's such an easy way to start - don't get worried with your colouring with pens, they can be a little daunting...
So here is the project for today.

I will give you a full list of what I've used at the end, but I started by stamping the beautiful Jolly Holly stamp with cloudy grey Stazon ink. I used stazon because I needed a permanent outline as I was watercolouring, and I chose Cloudy Grey so it wasn't too harsh against the vintage papers.
I coloured the stamped image in with Brunzeel Aquarel Expressions pencils - boy, these are gorgeous! They don't leave harsh lines, but if you are in any doubt about any pencils you have, just scribble off the point of the pencil to give you a softer start.

After I coloured the bauble with the pencils, I took a little darker colour on the brush direct from the pencil and added shading to the side edges. As you can see, there is also a little glitter on there. This was from adding some of the Sakura Stardust pens and painting them out with water to spread the glitter.
I had stamped two lots of the foliage around the swirl and coloured these in the same way with the pencils. I cut them out so I could add dimension to the finished card with the silicone adhesive.

I added some shading around the bauble and the swirl by using a charcoal pencil and I blended it out with a paper stump. I chose to add some extra colour to the swirl with a Micron pen, and then used my Stix 2 2-in-1 glue pen along areas of the swirls. I left it to go tacky (it will go clear) and then added some foiling to give it some sparkle. I chose the dark brown foil from the Transfer Foil pack.

Some finishing touches were the ribbons, flower and greeting board, and I added some already cut paper snowflakes which I had stuck around the card.
Here's your quick step by step and shopping list. Enjoy!

- Cut your base card to 8" x 6".
- Use the Layer Perfect tool to cut layers of mirror card to 7.5" x 5.5" and the papers to 7" x 5".
- Use an offcut strip of paper to add the detail down the side, it doesn't matter what width and add mirror and white card down the edges. Stick your snowflakes to the card and trim edges.
- Stick these layers to your card with your Tape Runner.
- Stamp and colour your image as detailed above. Foil the image if required.
- Add shading around the outside of the image with distress inks if you want a nice vintage look.
- Trim to leave a small edge and layer with mirror card and white card. Use Silicone glue to the back of the topper to give height and attach to your card.
- Cut out the remaining leaves and shape with your fingers to give it a curl. Add silicone glue to the back and add to your card. Add some white dots to give details.
- Tie a large luscious bow and attach this, a flower and your sentiment board to the card with silicone glue.
SHOPPING LIST
S57321 Stix 2 layer Perfect Tool.
S57269 Stix 2 Tape Runner
S57100 Stix 2 Silicone adhesive
Stix 2 2-in-1 glue pen
S57109 Stix 2 Transfer foils
S57275 Stix 2 Snowflakes
JG5284 Woodware Jolly Holly stamp
White cardstock
Guillotine
Gold Mirror card
Papers (I used Dovecraft Winter Blooms)
Hobbycraft Mini Christmas signs
Stazon ink - Cloudy sky
Brunzeel Aquarel Expressions pencils
Sakura Stardust pens
Sakura Micron pen 0.1
Subscribe to:
Posts (Atom)