Wednesday, 26 October 2016

Little Angel...

Yes, I'm afraid I'm in full Christmas card swing now... and it's been really lovely to get time to sit and make some, and also share my makes on here with you all. 

So, what have I got to share with you all today? Well, it's this sweetheart here. The cutest little Angel there ever was. You can paper piece her, stamp and colour her, doodle in her, the choice is entirely upto you. 

But on this card below, I chose to colour her in very simply using my new Colourista pens and pencils - and as you can see, they work amazingly well. 


There are a few different things I've used on this card, and I will be sure to list them at the end of the post. 


These fab little sentiment tiles would have been so easy to make had I thought about it, but I didn't, so a random purchase a while ago from Hobbycraft bought them home with me, ready for that perfect card.

So here she is - my little Angel, in all her finery. I will list all details at the end. But as you can see, the base colouring was done by stamping in Momento, as I was using permanent colours to colour in.  
I coloured in using the Spectrum Noir Colourista pencils and pens. I found the pens to be lovely with the brush nib - very precise. And then topped it up with the pencils too to deepen the shades. 


On this pic, you can see where I opted to use the foils that I recieved from Stix 2. These are nice and so easy to use too.... and lovely to enable you to add a bit of luxury. 

So - here's your step by steps etc. 
  1. Take your 8" x 8" card and cut some gold mirror card and patterned paper slightly smaller in layers using your Layer Perfect tool. Stick these together and attach to the card blank. 
  2. Take a contrast paper and cut out with a circle using your Layer Perfect tool too. Really easy to do this!
  3. Cut a strip of gold mirror card to around 2" wide x 7.25" long. Cut a piece of patterned paper to 1.75" wide x 7.25" long and stick together. Wrap a length of ribbon around the whole piece and then attach to the card. 
  4. Stamp your image using Momento Tuxedo Black and colour in with your chosen pens or pencils. Add some sparkle with your Sakura pens. 
  5. If you take your Stix 2 2 in 1 glue pen, draw around the pieces you want to foil and leave to go clear. (It goes on blue - permanent adhesive, dries clear - temporary adhesive) Then pop your foil sheet over the top and rub over to adhere the foil to the glue. 
  6. Cut out leaving a small border, then layer onto a piece of mirror card. Trim to leave a small border. You can measure this very easily using the Layer Perfect. 
  7. Attach the angel topper to your card using Stix 2 silicone adhesive. *I opted to use silicone because you have different depths underneath the topper, so the silicone will adjust the height accordingly*
  8. Finish your card by adding a bow to match your ribbon, a central flower and a board sentiment. I also added a wooden heart and some pearl drops around the design. 


I hope the steps make sense... really, you can just have a play with the topper once you have coloured her in, or paper pieced her. She will look beautiful whichever way you play with the stamp. 

Here are the bits I've used in my card. I would love to see what you have made... please share! xxx

SHOPPING LIST

Stix2 S57321 Layer Perfect Tool
Stix2 S572269 Tape Runner
Stix2 S57109 Transfer Foil
Stix2 2 in 1 glue pen
Stix2 S57100 Silicone Adhesive
Woodware FRS223 Patch Angel stamp
Sakura Stardust pens
Colourista pens and pencils
Momento ink - Tuxedo Black (if using alcohol pens. Stazon if watercolouring)
Dovecraft Winter Blooms paper pack
Hobbycraft Mini Christmas Signs
Hobbycraft Wooden Heart Topper

Friday, 21 October 2016

Bauble time....

Morning folks.... 

How are you all doing? Things this week have been a bit busy - not too bad - just sorting out show products for upcoming hours on Hochanda, and also been out and about visiting a very lovely person... but more on that another time!

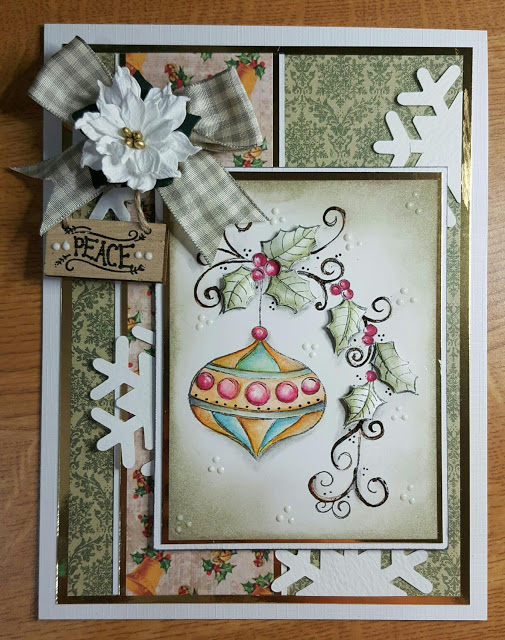
Today, I thought I would share a little project I've made for Stix 2, and I've used a few other Woodware bits on there... and a little bit of watercolouring. Who doesn't love putting away the alcohol pens and getting back to watercolour. It's such an easy way to start - don't get worried with your colouring with pens, they can be a little daunting... 

So here is the project for today. 


I will give you a full list of what I've used at the end, but I started by stamping the beautiful Jolly Holly stamp with cloudy grey Stazon ink. I used stazon because I needed a permanent outline as I was watercolouring, and I chose Cloudy Grey so it wasn't too harsh against the vintage papers. 

I coloured the stamped image in with Brunzeel Aquarel Expressions pencils - boy, these are gorgeous! They don't leave harsh lines, but if you are in any doubt about any pencils you have, just scribble off the point of the pencil to give you a softer start. 


After I coloured the bauble with the pencils, I took a little darker colour on the brush direct from the pencil and added shading to the side edges. As you can see, there is also a little glitter on there. This was from adding some of the Sakura Stardust pens and painting them out with water to spread the glitter. 

I had stamped two lots of the foliage around the swirl and coloured these in the same way with the pencils. I cut them out so I could add dimension to the finished card with the silicone adhesive. 


I added some shading around the bauble and the swirl by using a charcoal pencil and I blended it out with a paper stump. I chose to add some extra colour to the swirl with a Micron pen, and then used my Stix 2 2-in-1 glue pen along areas of the swirls. I left it to go tacky (it will go clear) and then added some foiling to give it some sparkle. I chose the dark brown foil from the Transfer Foil pack. 


Some finishing touches were the ribbons, flower and greeting board, and I added some already cut paper snowflakes which I had stuck around the card. 

Here's your quick step by step and shopping list. Enjoy!


  1. Cut your base card to 8" x 6".
  2. Use the Layer Perfect tool to cut layers of mirror card to 7.5" x 5.5" and the papers to 7" x 5". 
  3. Use an offcut strip of paper to add the detail down the side, it doesn't matter what width and add mirror and white card down the edges. Stick your snowflakes to the card and trim edges. 
  4. Stick these layers to your card with your Tape Runner. 
  5. Stamp and colour your image as detailed above.  Foil the image if required. 
  6. Add shading around the outside of the image with distress inks if you want a nice vintage look.
  7. Trim to leave a small edge and layer with mirror card and white card. Use Silicone glue to the back of the topper to give height and attach to your card. 
  8. Cut out the remaining leaves and shape with your fingers to give it a curl. Add silicone glue to the back and add to your card. Add some white dots to give details. 
  9. Tie a large luscious bow and attach this, a flower and your sentiment board to the card with silicone glue. 
SHOPPING LIST

S57321 Stix 2 layer Perfect Tool. 
S57269 Stix 2 Tape Runner
S57100 Stix 2 Silicone adhesive
Stix 2 2-in-1 glue pen
S57109 Stix 2 Transfer foils
S57275 Stix 2 Snowflakes
JG5284 Woodware Jolly Holly stamp
White cardstock
Guillotine
Gold Mirror card
Papers (I used Dovecraft Winter Blooms)
Hobbycraft Mini Christmas signs
Stazon ink - Cloudy sky
Brunzeel Aquarel Expressions pencils
Sakura Stardust pens
Sakura Micron pen 0.1


Friday, 14 October 2016

Simple and spooky

Oooooh it's been a few days hasn't it?! 

I have had a bit of a busy week getting ready for my first few shows over on Hochanda. And do you know... I loved it. It has such a warm, welcoming feeling there and I felt at home straight away. There were so many familiar faces too, which was lovely. Anyways.. more on that later. 

I have also not been very well - I'm sure I've got the worst edition of Man Flu! It started last week with a swollen throat, developing into a full-on cold and cough. I've not felt so rough for years!! But here I am, and I want to share a little card that I made using this gorgeous little witch stamp I've had in my stash for quite a while. 

Isn't she just the cutest?? I chose to colour her with promarkers on this card, but added some shading with pencils to add a little depth and some shadows under her lovely shoes. 

The extra little bits and bobs in the stamp set - the bats, the moon - I chose to randomly stamp around and then finished off with a black liner pen around the outside edges to keep it simple. 

Wednesday, 12 October 2016

Birthday cuties....

Helloooooo y'all... 

How are you??

I've had a pretty busy week this week, preparing for my first ever show over on Hochanda - a little bit nerve wracking but everything was lovely, and the folks there are wonderful. Great atmosphere, familiar faces and a kettle. What more does a girl need, right?

Apart from being busy, I was creating a couple of cards to send off to my beautiful daughter for her birthday. I made two as she has a little furry friend in the family who dotes and loves her to pieces - that is our Scoobs. Her baby. He loves her to bits... but more on that later... 

The stamps I chose to use are Woodware and I chose the turtle and the puppy. The turtle is a private joke from years ago when she was in the air cadets lol, and this stamp is just so perfect. I love it. The little cheeky expression on his face is so cute. 


I coloured him with copics (I can give you the numbers if you need them) and added some shadows and white highlights for details. 


of course, all of my little characters have to have blushy cheeks - it's the law! So, he was given his blush and some white highlights to his eyes and cheeks to add some sparkle. This card was from the grown ups. 

The card below, was from the furbabies. Namely Mr Scoobs. lol. 

I coloured him in so he looked sorta spaniel coloured, and used the same paper pad as above so that the cards matched. The layouts I kept quite simple on both, as I didn't want to deter away from the great images. They make the focal point on any card. 


Again, I used the copics to colour, if you want to know the colours, just ask. I do have them written down. I added sparkle to the hearts, a few dots to the blushy cheeks and eyes and some details along the ribbon and top borders. 


Inside the card, Scoobs managed to 'paw' his little sentiment - yes really, all by his own fair pawsies! He even sent his favouritest person a gravy bone inside the card too. lol. She loved it and it made her giggle. 

I hope you like today's cards... they were so easy to make with the quality of the stamps, and I totally enjoyed getting back into my colouring (something I have missed of late!) 

I will be back soon to share a few more projects with you, but until then, Happy Crafting!!!

Wednesday, 5 October 2016

Seasons Greetings from me.....

Hello my little bloggeroonies... 

Something a little different from me today, as I have been playing with a few products that I was sent from the fantastic company of Stix 2. As you may know, they do those awesome adhesives, but not only that... they also do a few things that I've featured on my card. 

So... where to start? Well, this is the card I kmade, and as usual, I started with the background colours of cardstock and papers as I knew I was going to be using a Woodware stamp to create the card. This is one of the easiest ways of choosing your colours - 1. Choose the paper and card colours. 2. Colour your image to match the card. 

On this one, I went for a lovely pale dove grey and slate grey card. The papers were in a new set of Joycrafts designs that I got and the greys matched perfectly. 


I scored my A4 card in half, then trimmed it down to create a square card measuring 15cm x 15cm. The dove grey layer was cut to 13.5cm x 13.5cm. The next layer to 13cm x 13cm. Then the DP was cut to 12.5cm x 12.5cm. From now until the end of the cutting and prepping, nothing was stuck together unless I mention to. I know... bossy right?!

Around the edges of the card and the DP I used the Stix2 Layer Perfect tool to create my sweet dotty pierced border. It makes light work of ensuring everything is nice and level, and that the holes are even. Easy peasy. 

I used the same cardstock to cut my frames. I cut two from the Dove and Slate Grey card and did a little inking and drop shadow work with it. *Drop shadowing is simply where you layer one on top of the other and slide it down and to the side to see both bits of cards, creating a shadow*. 

I stamped my chosen image using Momento ink, Tuxedo Black and coloured with Promarkers. I added a little bit of dark pencil to add extra shadow. Once the colouring was finished, I cut around the outside edge of the image leaving the middle intact. I dusted around with a little distress ink to add some shading. The bow was stamped twice, coloured and cut out then used to add dimension. 


So now comes the fun piece of sticking everything together. I stuck my base layers together, upto the DP and the slate grey it sat on. I glued these together, but didn't attach to the card as I wanted to add the seed beeds and glitter to the borders. I used a little PVA glue and sprinkled them around the outside edge. Leave it to dry to ensure they don't move around. 

Once dry, attach it to the card using the foam pads and add your frame to the centre of the card front. In the centre of the frame, mount your stamped image using foam pads to add dimension and finish off with a little of the clear glaze over the berries. 


I love how the sparkles look... they make a real change from using mirror card. I hope you'll agree. 

Here's the shopping list if you would like it. I hope you like the card as much as I have enjoyed making it. Happy Crafting!!!

SHOPPING LIST

Stix 2 Layer perfect tool (557321)
Stix 2 Seed glitter (57080)
Stix 2 Ultraclear Tape
Stix 2 Tape Runner (red - high tack) (557269)
Stix 2 Craft foam strips (557318)
Woodware Holly Wreath stamp - (FRS102)
Docrafts Outline Stickers - Traditional Christmas sentiments (PMA810907)
Promarkers - Pear Green, Moss, Olive Green, Ice Grey 1.3.5., Red, 
Berry Red, Magenta, Caramel, Cinnamon
Papers and Diecut - JoyCraft!
Animated Social Gadget - Blogger And Wordpress Tips